Halaman

Friday, December 1, 2017

2 Ways to Install Wifi at Home Most Complete

Internet is one of the media that is popular today, do not know the age of both young and old all know the name of the internet even for some people the Internet became one of the basic needs. In addition as one of the internet entertainment is also commonly used as a medium to promote products that will be sold to those who are involved in the world of online business. As for example, bias is used as one of the best ways to sell a house online so it makes it easier for you.
ads 
Because internet needs is very important then many people choose to install the internet connection at home instead of having to go to the cafe, in addition to more affordable price we are also free to use the internet anytime we want.
How to Install Wifi at Home
There are several internet connections that I would recommend to use like a USB router that will connect with a USB modem and Mifi (WiFi modem). Here I will explain how to install wifi using USB router and how to install WiFi using MiFi (WiFi Modem).
USB routers can be purchased at online stores throughout Indonesia such as Tokopedia, Lazada, Open Lapak and ditoko offline price about 200,000. Prices can be reduced if we buy a cheaper model. Also read about how to save electricity pulse.
In this article I will discuss about how to plug wifi at home that will be reviewed more deeply, let us refer together below - the explanation below:
1. Using USB Router
When you decide to use a USB router then you must pay attention to the things that related and support USB performance and explanation, as well as:
  • Buying a Router that supports USB modems that we have or we buy, it is advisable to use a USB router because the price of a USB router is more affordable than MiFi (WIFI modem) which is relatively more expensive, but still does not reduce the quality and performance of the network. There are several models of USB Routers such as TP LINK MR3020 and TP LINK MR3420. The cheapest is TP LINK MR3020.
  • Buy a SIM card, adjust it with the modem we use whether using CDMA or GSM because if wrong then the internet connection will not run.
  • Buying a USB modem (if you already have the benefit of existing) it will reduce the cost we will spend.
  • Prepare the sim card (xl, indosat, telkomsel etc.) depending on which provider we use, before input to the modem first registered the internet package if not then the router will not connect to the internet.
  • Enter the SIM card to your USB modem, make sure the SIM card that we buy in accordance with the modem that we use if the CDMA modem then kartupun must CDMA (bolt, smartfren, Flexi etc) if GSM modem then the card must be GSM (Telkomsel, Indosat, xl etc).
  • Then plug the USB modem into the USB Port on the Router, make sure the USB Router that we use supports the modem that we use if not then the router will not connect to the internet.
  • Plug the router into a power outlet (do not forget to turn on the rotor) if you use TP LINK 3020 router once the router is plugged into the socket then the router will automatically turn on.
  • After the router turns on the WiFi signal will turn on your home and WiFi is ready for use. Also read about how to amplify tv antenna signal .
Sponsors Link

2. By Using MiFi (WiFi Modem)
How to install Wifi in the next home is to use Mifi. Many people who also choose to use this one because it proved pretty good results. So that the various needs and daily activities can run smoothly. Here's how to use MiFi:
ads
  • Buy MiFi for example Smartfren Andromax M2P, Andromax M2Y, MiFi bolt etc for MiFi bundling (lock) price estimate usually around 300,000 or Huawei E5573 and Huawei E5577 for MiFi non-Bundling (unlock) estimated price is usually around 700.000, model and brand depends what which we want to adjust to the budget we have.
  • Prepare a SIM card that has been registered for non bundling package while for the MiFi Bundling usually already includes a SIM card and also bonus Internet in it so no need to buy a sim card and register the package.
  • Put the SIM card into MiFi for Non Bundling.
  • Plug MiFi into the Stop contact, then turn on MiFi by pressing On / Off Button.
  • Wait a few moments until MiFi lights up then MiFi Signal can be used in your house. Also read about installing parabolic antennas .
Before installing internet connection it would be nice we read the following tips to improve the security of our wifi network.
  • Wifi Key with Password. This will protect Wifi from the use of people we do not know and also users who secretly steal internet access via your wifi connection.
  • Choose a password that is hard to guess. Use a password combination letters and numbers at random this will be difficult for them to break into your internet network.
  • Replace WiFi password periodically. This way to avoid users who kemugkinan already know our old password.
  • Change your WiFi Router username and password. Do not forget to change your default username and password when you first set up Wifi.
  • Register your MAC address gadget. By registering MAC address (MAC Filtering) on the router device then unregistered devices can not connect to our internet network
  • Create a limited WiFi user IP address. This can be set on your router's DHCP server setup, limit it to only 3 IP addresses provided by WiFi users only. By limiting the number of ip address it will minimize the user who breaks into your internet network.
For additional security settings WiFi, we must login / access our wireless router.You can type http://192.168.0.1, http://192.168.1.1 or http://192.168.0.0254 in your browser to conect to a wireless router, or you can read the manual every wireless router device attaches to it.
That is how to install WiFi at home without having to install the most expensive and complete home phone, before installing internet connection it would be nice we adjust to the needs and also our budget.
Sponsors Link

Surely there are advantages and kekuranangan both MiFi and Router, Mifi excess is more simple and not bother because we do not need Modem again but the price is relatively expensive, especially non bundling while the router costs cheaper and can also use any operator depending on the modem we use. Also read about how to save on water pumps .
It is advisable to use a USB router other than the cheap price we can use both GSM and CDMA SIM card depending on the Modem we use, make sure the router we buy supports our modem if not then the router will not connect to the internet.
It can be concluded that the article on how to install WiFi at home that has been reviewed above in detail and packaged well is expected to help facilitate you in learning and understanding it more deeply so it is worthy of being used as a reference source.
Up here first yes this article that discusses how to install WiFi at home. Hope it can be useful for my friend and thank you for taking a little time to read my article. See you in other articles.

Thursday, November 30, 2017

5 Ways to Overcome the Septi Tank's Odor and Its Causes


The smell of sept tank does sometimes make many people become less comfortable. In addition, air contaminated septi tanks if inhaled very unhealthy for the body. Odor - the smell is caused by the presence of bacteria from feces that begin to rot. For that we need the right solution that is used as a way to overcome the smell septi tank.
ads 
Actually the smell that may arise from septi tank can be avoided since the beginning before the process of making septi tank itself. Therefore, techniques are needed and many considerations of the possibilities that will occur next.
How to Overcome Smell Septi Tank
In this article will discuss how to overcome the smell septi tank which will be reviewed more deeply so that you can make as reference materials, let us refer together - the following explanation:
Before discussing how to overcome the smell septi tank, it would be nice we know in advance things - things that cause the appearance of the smell on septi tank.
  • Channels or Ventilation Pipes
The placement of ventilation pipe which is the only air circulation for septi tank can be the main cause of the smell of sept tank contaminating the air around you. For that I suggest do not put the ventilation ducts on the front of the house area. The function of the septic tank vent is not much different from the general ventilation function of the house .
  • There is a gap in Septi Tank
The gap in the septi tank will make one of the causes of the unpleasant smell, especially during the rainy season. Rain water will flow into the septi tank and make it fuller only. In the end when septi tank can not accommodate rain water, it will overflow septi tanks and trigger the smell.
After knowing the cause of the emergence of the smell from septi tank, now we will discuss how to overcome it, the explanation as follows:
1. Making Septi Tank In The Back Area House
Making septi tanks on the back of the house will minimize the odor that may be caused by septi tank itself. Usually this method is used by many people who have a large area of land as well as in rural areas.
It should be septi tanks should be made in an area a little distance away from home for family health can stay awake. But for a modern society whose land is narrow there is a special way to outsmart it. Also read about the criteria of healthy homes
Sponsors Link

2. Make Septi Tank Under Building
How to overcome the smell septi tank next is to make septi tank under the house building. For those of you who live in urban areas of course will be difficult to get a special field for the manufacture of septi tanks.
In the end the most appropriate solution is to place a septic tank under the house like under the bathroom or under the garage of the house. Next you must follow how to cement the home page as a solution to reduce the gap on septi your tank.
This method is very appropriate and made as an option. By putting a septic tank under the house building, there will be no smelly gap that can come out except through the special ventilation channel that has been provided. For that, consider making septi tanknya well, so there is no gap. Also read about the type of residential type .
ads
3. Laying the Ventilation Channel in the Right Place
Ventilation channels that serve as air exchange on septi tank indeed need to be considered and considered placement to avoid the risk of odor that may be caused. Point the ventilation duct in a closed ditch or rear area of the house that is rarely there are people passing by.
Surely many people are wondering, why septi tanks should be given ventilation ducts? Ventilation is not only used for air exchange, but also used to remove water vapor which can help to reduce the water content inside sept tank so it is not full fast. Also read about tips on making floor plastering .
4. Closes All Available Gaps
Gaps that exist in septi outdoor tanks can cause water to flow and into septi tanks during the rainy season arrives. This is one of the causes of the smell on your septic tank. The rain water that continues to flow and fill the septi tank, over time will overflow out of septi tanks.
So that the stools that have been decomposed will also carry the flow of water causing unpleasant odors and very disturbing your daily activities or any other people who are around. Health quality can also decrease, if this condition continues to be left alone without any further handling.
5. Diligently Drain Septi Tank.
It is appropriate for those of you who have septi tanks to pay attention to your tank conditions. When the time should be drained and cleaned, you should have understood it. You can subscribe to sucot wc to make the draining process easier.
Later wot suction team will routinely remind you to always perform draining according to the ideal time that has been estimated from the beginning. To maximize the drainage you can use enough seeds of bacteria to be sprinkled into septi tanks, then the stool will decompose and automatically will be clean.
This method is already widely used in modern cities because of the practicality it offers. So there is no excuse to be lazy about keeping your tank clean at home.Proper handling will improve the quality of your life as a family.
Can be concluded that the article on how to overcome the smell septi tank that has been reviewed above in detail and packaged well is expected to help facilitate you in studying and understand it more deeply so worthy of being used as a reference source.
Until here first yes this article that discusses how to overcome the smell septi tank.Hope it can be useful for my friend and thank you for taking a little time to read my article. See you in other articles

6 Ways to Buy House Without Deposit


How to buy a house without a deposit can be done through certain stages. For that you as a potential buyer must seek as much information as possible in order to facilitate the purchase process that you will do.
ads 
Moreover, to get a house without a deposit is not easy, if you do not know the correct stages.But if you already know and follow all the requirements needed will be very easy.
How To Buy House Without Deposit
In an increasingly difficult era like today, not everyone has the ability to buy a house even more with a sizeable deposit. But you do not have to worry anymore, there are several ways that you can make as one reference by utilizing the assets we have.
For those of you who do not have any assets, then you can ask the help of parents without having to hurt and even burden him.
In this article I will discuss about how to buy a house without a deposit that will be reviewed more deeply, let us refer together below - the explanation below:
1. Ensure Land Certificate
If you do not have enough money to buy a house even if it's a credit, you can pledge a parent's land certificate. But you are obliged to give prior understanding to the parents. It is not advisable to pledge it without your parents' knowledge.
Besides the behavior is not good, later you will definitely feel the difficulty itself.Should be chatting directly to your parents to understand and support your good intentions. While young must work hard and productive. You can find information on how to pledge home certificates in the bank in order to maximize the revenue you will earn.
By using a land certificate, you can buy a house by cash. Furthermore, you can pay the mortgage directly to the bank every month in accordance with the tenor that has been set and of course according to the agreement of both parties.
I am sure if you are good intentions and seriously surely parents will understand.The more you delay the more expensive the price of the property and you will no longer be able to buy it.
Especially if you are a man, have the obligation to prepare a place to live to nurture a household later. Keep positive thinking and keep commitment, so that the installment process can run smoothly until finished.
Sponsors Link

2. Applying for KPR to Various Banks
How to buy a house without a further deposit is to make a mortgage submission independently. The submission of self-made mortgage to the bank in my opinion is quite complicated, but nothing is impossible is not it? Previously you certainly already know about the notion kpr to be the main provision in the process of filing a mortgage.
ads
KPR submission independently, of course, will not require a deposit in advance as you apply for credit through the housing marketing office itself.
If through the marketing office, it will definitely need a deposit. Because it is one of the main conditions to be approved credit application. For those of you who do not have enough funds, look for housing that can be done mortgage submission independently.
3. Increase House Price When Filing a Credit Card
When you apply for KPR independently, try to increase at least a range of between 30 percent and 50 percent. This is done to get the funds we want.
Surely the bank will issue loan funds by lowering its rate 30 to 50 percent of the sale price. So you will get funding according to your target. Furthermore, you can pay the housing paid to the developer or marketing housing.
As a result you only need to pay monthly installments to the bank directly without having to issue a deposit to own the house. In my opinion, this way is right but you need to do it wisely and confidently. Read also on how to over credit home to increase your insight.
4. Doing Cooperation With Homeowners
The way this one really needs a special technique in order to convince homeowners to believe in you. Agreement between owner and prospective buyer is difficult without any significant effort. Homeowners tend to want as soon as possible to get fresh funds as a result of the sale of the house. But on the other hand if you do not have a deposit at all, is it possible you do?
Cobala you speak well and full of confidence in the home owner. Give explanations - explanations that make him interested so you can pay it without having to issue a deposit.
For that self self-possessed with knowledge and a lot of information about the property so that when you speak do not look confused. Well the confusion will make the homeowner to be unsure of you. Also read about how to over credit home kpr .
5. Understand First the House Price Range that You Are Looking For
Price is one of the main components when you want to buy something. No different during home purchase process. You must first compare a lot of housing to get the best price.
Sponsors Link

This price range can then be used as initial capital when you decide to apply for housing loans independently. That way the bank will more easily believe the explanation you utarakan, because it already knows a lot about the price range of various types and also the type of housing. Also read about home purchase procedures and cash .
6. Look for Houses that May Offer a Free Deposit Program
This latter way may very rarely be found. But you as a potential homeowner, must persistent and diligent search for information for your future better. If you are constantly seeking and routinely searching for information, I guarantee you will have good results.
Do not be afraid to fail before doing anything. Because in reality, the shadow you think is difficult, it turns out if done not as difficult as your shadow. The point is to be sure of yourself.
It can be concluded that the article on how to buy a house without a deposit that has been reviewed above in detail and packaged well is expected to help facilitate you in learning and understanding it more deeply so it is worthy of being used as a reference source.
Up here first yes this article that discusses how to buy a house without a deposit.Hope it can be useful for my friend and thank you for taking a little time to read my article. See you in other articles.
7 Ways to Strengthen the Tv Antenna Signal With Its Review

How to amplify the tv antenna signal is a unity that the process is almost the same as how to install a parabolic antenna, can be done based on the installation process of the tv antenna you do. Strong weak signal can be determined from several environmental factors, place of installation and other things. For that the installation process of the antenna can not be done arbitrarily.

ads 
For those of you who have not been able to and have not even done the installation of antennas so that can be obtained strong signal, then you can find information first to find out more before deciding to install it independently.
How to Reinforce Antenna Signal Tv
Installation of antennas can not be done carelessly in order to produce a clear or even fun when watching. For that we need the right way and technique so that there is no wrong pairs so make you have to work twice.
In this article I will discuss about how to amplify the tv antenna signal that will be reviewed more deeply, let us refer together below - the explanation below:
1. Install Antenna In The Right Location
To get a strong antenna signal, then you must determine the exact location to set up antenna mast and then install the tv antenna. The higher the pole, the better the signal can be caught.
Do not forget to consider the surrounding area, such as many trees or not. Try to keep the antenna away from the area with lots of trees. Trees can be regarded as a signal barrier that will be caught.
2. Prune Tree Chain Blocking Signal
If it is forced around your house filled with trees, then you can trim a branch or twig that may block the signal. Perform routine pruning, as the more trimmed the tree will bring more branches.
Furthermore you can also clean the dried leaves that may fly and stuck in the antenna. Clean also the tile of dried leaves that begin to accumulate, because a great opportunity in the wind and nesting on the antenna. The possibilities that can happen are mandatory you think.
Sponsors Link

3. Directly position the antenna
The correct and correct direction will determine the good or bad of the captured signal. Before deciding to tie the antenna pole to avoid spinning when blown, then you must test the direction of your antenna. This point is very important because it includes how to install a tv antenna at home that you should pay attention to.
Checking process should be done by two people by cooperating. The one person can stanbye in front of the television and the other person can do the antenna play slowly. If it is agreed that the right direction so many channels obtained, then you can tie the pole using a wire to be stronger and not easily move when the wind blows hard.
ads
4. Note the Elevation of Antenna that you Install
How to amplify the next tv antenna signal is to consider the height of the pole used. Many people install a tv antenna with a certain height for reasons of getting good signals. Indeed theoretically the higher the antenna pole, the better the signal gets so that the television show becomes more clear.
But you also must consider the bad things like lightning. The more towering the antenna pole you will be more likely to be struck by lightning. For that you can pair the lightning rod. If this makes you a hassle, then you can determine the height of the antenna mast in accordance with other antennas that are in the home environment.
5. Watch the Antenna you Use
This point is one of the tips on choosing a tv antenna that you can use in order to amplify the tv antenna signal. The quality of the antenna you use can also determine the results obtained. Choose a good quality antenna, but not necessarily expensive. You can follow the many brands used by the public at large.
I think it will be much better, because it has been proven that many who use the means are certainly good quality. You also do not hesitate to ask the neighbors and other communities to increase knowledge in terms of installation of a good and correct antenna.
6. Use Booster
Booster is a device used to connect a cable attached to a direct antenna with a cable connected to the television. Booster is quite tough in terms of maximizing the signals and channels that appear on your television.
Booster is very suitable for use and applied in remote areas or which is difficult to get signal coverage. Later you can prove yourself impressions images that appear before using the booster and after using the booster. Guaranteed to be much more clear and comfortable when viewed the eye. Also read about tips on choosing tile .
7. Note the Type of Antenna
The type of antenna you choose and use also greatly affects the quality of the resulting image. Please choose to choose with your living conditions. For example, such as compulsory highland or lowland, weather, environmental and other factors that may affect.
If you do not understand, you can search for information first. Before buying you ask your neighbors or relatives who know about the type, the type and the price.Because sellers are not all honest about specifications, matching types or prices.
The important thing they sell merchandise aja. Many such experiences are experienced by many others. So you must be knowledgeable so as not to be harmed. Read also on how to deal with leaks on the roof of the house .
It can be concluded that the article on how to amplify the tv antenna signal that has been reviewed above in detail and packaged well is expected to help facilitate you in learning and understand it more deeply so it is worthy of being used as a reference source.
Up here first yes this article that discusses how to amplify the tv antenna signal.Hope it can be useful for my friend and thank you for taking a little time to read my article. See you in other articles.

10 Ways to Eradicate Lizard and Gecko

Lizards and geckos are reftil animals that usually crawl on the walls of homes and trees, both have a shape that looks almost similar in size only in terms of size, if the lizard has a small body size other than the geckos, gecko has a fairly large body size.

ads 
Lizard and gecko can also be regarded as a big enemy for those who do not like lizards and its existence must be destroyed even if for example there is only one tail at home, their existence at home is quite disturbing other than the sound of gecko that is very disturbing our break, also dirt lizards and geckos that make the house become dirty and smelly. Very disgusting is not it?
How to Eradicate Lizard and Gecko
Compared to other animals such as termites, the presence of lizards is actually not too disturbing. Many Indonesians are not too concerned about the existence of lizards in their homes because there is rarely direct contact with humans. how to eradicate termites in the closet is different from how to eradicate lizards and geckos in the closet. Special techniques and ways are needed because the lizard or gecko is an agile animal.
In this article I will share how to eradicate lizards and gecko as well as how to eradicate mosquitoes that have been reviewed before, let us refer to together the explanation below:
1. Using the Peacock Tail Feather
the peacock feather tail if you observe correctly turns out to form a large eyeball and it is a psychological thing lizard or geckos that naturally scare peacock feathers. The way of hanging peacock feathers on the walls of the house, then lizards and gecko will not dare to be on the walls of our homes.
2. Using Egg Shells
Egg shell can also be used to repel cicak or geckos, simply grab the egg shell unused shell or other eggshell and crush it. place these shell fragments above the cupboard and above the ceiling or in places where many lizards and gecko passes.
With crabs this egg shell will make lizards and gecko will not stay for long in that place, because according to them crumbly eggshells are their eggs that have been destroyed by other animals this will make them feel threatened. You also need to understand how to eradicate earnings to increase insight in terms of handling insect bugs.
3. Using Onion and Pepper
Lizard and geckos are animals that do not like the smell, the distinctive smell possessed by onions and pepper is hated by lizards and gecko. The way is puree onion and pepper, then mix with water after mixed spray this liquid to where the lizard and gecko hide or where the ordinary gay and gecko passed, then the gecko and the gecko will leave our home.
Sponsors Link

4. By Utilizing Coffee
For coffee lovers, coffee is one of the must-have drinks every morning. The typical smell makes coffee a lot of interest in the benefits of coffee in addition to making us morale can also reduce drowsiness, but there are other functions of coffee that is as a repellent lizards and gecko.
The smell of coffee is very unlikable lizard or gecko, how to take coffee or coffee beans and then spread the table eating function as a protector of food so as not to be infected by gecko or gecko. In addition to dining table we can also spread the coffee powder in places usually lizards and geckos are.
ads
5. Using Tobacco
How to eradicate lizards and geckos next is to use tobacco. In addition to coffee, tobacco is also very powerful to repel lizards and toke, this material is also safe to use.
The way to prepare tobacco sufficiently, then putakan in every place that is usually passed by cicak or gecko, on the cupboard or flapon also place to store food. This method is powerful enough to repel geckos and lizards. Tobacco can also be used as one way to eradicate a fire ant that is quite powerful.
6. By Using Garlic
In addition as a spice garlic kitchen is also very healthy for the body. But not for lizards or geckos, the smell is very sting to make lizards or gecko fear.
The trick, mix the garlic slices with water and spray to the place of dima cicak and gecko it live or can also put a slice of garlic in place of lizards and gecko nest.
7. Trap By Using Glasses
Although it can stick to the wall, but lizards are usually difficult to stick to glass glass. Therefore you can trap the lizard by using a tall glass and have filled the food or drink in it. When the lizard has entered it will be difficult to get out of the glass and over time will die. You need to also understand how to eradicate cockroaches at home .
8. Maintain the Kitten
Kittens are usually happy with small moving animals, usually a kitten will catch the animal and then will be used as a toy so that over time the little animal will be tired and die sometimes he will eat if starving.
Although kittens do not destroy all the lizards that exist in our homes but at least will reduce the population of lizards.
9. Maintain Home Cleanliness
Cicak and geckos do not like clean places, to reduce the existence of lizards or geckos, clean the house regularly clean every corner of the house, walls, dining table, or under the colour. If our house is always clean then cicakpun will not feel at home in our house.
Sponsors Link

10. Block the Cicak or Gecko Entrance Path
In order for lizards that are outside do not go into the house, obstruct their entrance. The trick is to install mosquito wire in the ventilation of your house. For small gaps between the doors, you can fit a special double tape to trap a small animal. Later trapped lizard you can dispose of without killing him.
That is how to eradicate lizards and gecko at home, we need to know that with the lizards or geckos can also reduce the population of mosquitoes and cockroaches.If the lizard population is not too much, we do not need to destroy it.
In addition to the natural way that we use above, there are actually ways to eradicate the lizard and gecko the easiest is to maintain the cleanliness of our homes. Because the lizard or geckos do not like clean places. So by keeping the house clean will reduce the level of population lizard.
So this article, hopefully the above means useful and also our reference to destroy the animals are very annoying. Thank you for the friends who have menyempatkan read my article this. See you in the next articles.

17 How to Plant Flowers in a Good Pot

Planting is a fun hobby for some people. Not only among women who love the hobby of planting crops, but many men who love planting-planting activities.Planting is a manifestation of our love for nature, so indirectly who has a hobby in the field of planting-planted participate in environmental conservation activities.The term "Go Green, Save Earth" means that green open space will help save the earth we live in.

How to Plant Flowers In Pot

For lovers of ornamental plants would have been familiar with planting a plant in a pot. This method is often done for those who like to plant planting but do not have enough land to distribute hobby, therefore they are lovers of plants can still channel his hobby through planting to plant a pot. Farming does not have to have a large land, but can also be done on a narrow land. The use of pots other than more efficient place, plants grown in pots will look more beautiful and neat. (read also: how to treat household waste )
Planting flowers in a pot is perfect for modern life at this time. Increased housing development, especially in urban areas, make the habit of growing crops in pots are increasingly popular from various circles. Know it own housing that the land is very mediocre, so the method of planting in pots is one solution for those who love gardening. In this article will discuss how to plant flowers in pots. Let's see! (read also: how to make wall hangings from paper )

1. Prepare the Tools Needed

Preparation may need to be done before planting. How to plant if the required equipment does not exist? First prepare the pot (adjust the large pot with the size of the plant), planting medium as the main component (soil, organic matter, charcoal, compost soil, manure, coconut husk, rice husk, humus, inorganic materials, and others as can be adjusted to the type plants), plants / flowers to be planted, small shovels, and water. The equipment must be completely prepared properly, because if less one of your materials will experience the hassle later. To simplify how to prepare, you better make a list of materials to be prepared, if there is already material and in the stretcher to avoid confusion. (read also: wall hangings from used goods )

2. Good Process of Drawing

In the process of planting in a pot can not be arbitrary and careless because it needs good handling if you want good results and plants can flourish. Here's the process:
  1. Use a pot that is suitable for the type of plant you will be planting in pots.
  2. Consider also where the placement of pots will be placed to be more balanced with the atmosphere and location.
  3. When choosing a pot, make sure also about the holes as water circulation already exists or not. The holes in the bottom of this pot will function to remove water if the water capacity obtained is too much so that plants are not submerged by water that can affect the growth of the plant itself. (read also: how to create a garden at home )
  4. Put the planting medium into pots about 1/3 of the whole pot.
  5. After that you can enter the plants you want into the pot. Make sure the plants are right in the middle to look more tidy.
  6. Put the planting medium back in the pot to cover the roots of the plant. Catch the plant while you enter the media planting with one hand to not move. Do not be too full to enter the planting medium so that when water splashing does not overwhelm everywhere and can be absorbed perfectly. Leave space for about 2 to 5 centimeters.
  7. Finish enter the planting medium, you can press the planting media slowly so that the plant can stand full. (read also: how to eradicate cockroaches at home )
  8. Put the plants in place enough air circulation and a good supply of sun for plants to grow well too.
  9. Do not forget to flush with enough water. If it is too much to make a plant rotten.
  10. After everything is finished clean the remaining soil in the neck of the pot and the exterior is dirty because the soil is scattered and attached at the time of inserting the planting medium into the pot.
  11. Perform watering process regularly. Ideally 2 times a day, ie morning and evening. (read also: how to maintain the cleanliness of the home page ).
Sponsors Link

3. Good Care Process

The process of care is also not separated from the process of planting itself. What is the use of planting if not balanced with good care. Surely the planting process that you do will be in vain if the plants you plant become unkempt and the ends die. If you do not want that to happen to you, then take good care of the plants you have planted. Here's the process: (read also: how to plug a house light switch )
  1. Perform watering process plants with enough water content alone, do not overdo it regularly every morning and afternoon.
  2. Try to put the plant is not too close together with other pots for plants have enough room for the growth and development process. (Also Read: How to Make a Clothes Cupboard from Triplex )
  3. Cut off the leaves of your plants that have started to dry, so as not to accumulate and accumulate in the bottom of the pot, because this can interfere with the growth of plants because the movement of the plant becomes more narrow.
  4. Then over time the process of flush watering the plant by using water, unwittingly the water will bring little by little the existing planting medium in the pot through the circulation hole that is on the bottom / bottom of the pot.Well, it should be of special concern to you. You must add the planting medium and a little fertilizer back to the pot, so the plant can still grow well.(read also: how to overcome the damp house )
  5. Place your pots in a place that has enough sunlight to support the growth of the plant. If the condition of the place does not allow it does not matter, but you should be a little tired of having to move your plants every morning to a location where there is enough supply of sunlight. Do it ideally every day in the morning, if you can not get done 2 or 3 times a week.
Also read:
  • how to care kitchen
  • how to choose the color of house paint
  • how to deal with cracked walls
  • how to eradicate ants at home
Can be concluded that how to plant plants or flowers in the pot is not as busy as we imagine. The process is quite easy and cheap but needs special handling so that plants can grow and develop properly. Up here first yes, the discussion on this article on how to plant plants / flowers in pots. Hopefully helpful, and thank you

Monday, November 20, 2017

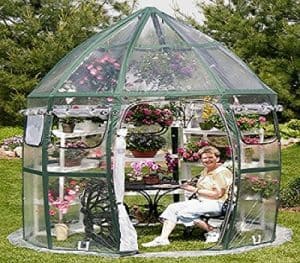
10 Ways to Make Green House Simple and Cheap


Creating a green house is not difficult in making it happen, as long as you understand all the processes, both from the preparation to the development process.Green house is a special building that has a function as a planting medium to help plants to grow optimally and optimally, from the time of breeding, storage to the process of cultivation.
ads 
In studying how to create a green house, you should also learn the meaning and a little origin of the term green house. Green house is an adaptation of the term greenhouse. Because the manufacture of greenhouses is very needed and not small, then the manufacture is replaced with a greenhouse made of plastic material. Because of this, there is a shift from greenhouse to green house (green house) in accordance with its function as a home for plants that are certainly green.
See also: How to Plant Flowers in Good Pots
Functions and Benefits of Green House
Green house is functional and useful to keep the plants from environmental conditions that will affect the growth of the plant itself. Examples such as factors of sunlight, humidity, temperature, wind, and pest attacks or air pollution. Basically the benefits of green house for plants are:
  • In order for planting activities can be done at any season. Each type of plant has its own properties and characteristics, which will determine when the plant can grow. Whether to grow in the rainy season or in the summer. By planting it in a green house environment, the desired environmental conditions as a condition of a plant can be manipulated. so that the plant can still grow optimally and maximally without season dependent and independent of other environment.
  • To improve the quality and quantity of crop production produced. By providing the elements of nutrition and attention to the environment within the green house, the quality and quantity of the production of each plant will certainly be better.
  • To Conduct organic cultivation of plants. If the condition of green house can be maintained and well maintained, the possibility of pests or plant diseases can be avoided. Under these conditions, the use of pesticides becomes no longer needed.
Read also: How to Organize a Small House to Look Great and Attractive
Green House Types
Each type of green house can be distinguished from its design. Each form of the design is designed with due regard to the surrounding climate factors and conditions. For example in tropical climates, how to create a green house will require a bit of engineering, that is, the shape and design of a green house will be made by using lots of ventilation.
The function of the ventilation will be useful in reducing the temperature or high temperature inside. While in areas where the climate includes sub-tropical, the shape and design of green house will be made more closed. The function of the enclosed design will be useful in maintaining the temperature of the air to stay warm inside.
There are 3 types of green house:
  • Tunnel Type: This type of curved or dome-like shape, where the walls and roofs are made together to close to form a semi-circle. Usually widely used environment that is in the sub-tropics.
  • Piggy Back Type: This type is also called tropical green house which is widely used in the tropics. This type of shape resembles a house with lots of vents on the roof.
  • Multispan Type: This type is a combination of tunnel type and piggy back type. This type is more widely used in agricultural blood that has a large scale, because it has a strong building structure but still economical.
Read also: How to Organize Home Page To Look Beautiful and Interesting
Sponsors Link

Types of Green House:
While the type of green house commonly used in Indonesia can be distinguished based on the material used, because it will affect the cost and age of the building.The following types:
  • Green House Bamboo
Is the most expensive type of manufacture cost, and widely used by farmers. The weakness of this type of green house is its relatively short life span because the material used is as vulnerable to pests. Usually green house bamboo use only UV plastic as a place of production of plants.
  • Green House Wood
Green house type of wood quality is better than the type of bamboo green house, because its life life is relatively more durable. Owned sanitation is cleaner when compared with the type of bamboo green house. Usually the bottom of the wall will be added to the cement to look more permanent, and the cover has been using various types of material choices that are also more permanent.
  • Green House Iron
This type of green house iron is the most durable type of use and of course in terms of cost is the most expensive manufacture. This is because the material used is the best quality seen from its strength. In addition there is usually an element of addition to some other equipment intended to support its use to be more optimal and maximum.
ads
How to Make Green House
There are several things or conditions that need to be considered in the way of making a green house for its use can be more effective namely:
  • The height of the roof should be made lower, maximum as high as adults.This is intended to facilitate the process of maintenance and during the process of catching incoming pests.
  • In making a green house should have good air circulation but still in a closed state.
  • The use of a net as a wall should be more dense and use transparent colors.
  • The use of costs in accordance with the budget that is owned, need to be considered in making the green house in order to avoid wasted funds disposal.
Problems that usually become an obstacle in making green house, in general the main problem lies in the cost factor. Actually if you can be more creative, you can also build a simple green house with a cheaper cost by getting the same function.
The main ingredients needed in creating a simple green house are:
  • Wood, Bamboo and PVC Pipes (paralon)
These materials are used for the manufacture of skeletons and also shelves for the plants. These materials can be used individually or can be combined with each other. Materials made of wood and bamboo in terms of financing are cheaper, but the strength can only last 2-3 years. While the iron has a more expensive price in the manufacture, but can last longer. The selection of PVC pipe is very suitable for the frame type of curve (tunnel).
  • Ultraviolet Plastics
Ultraviolet plastic is usually used to cover the roof. In addition, there are some materials on the market that you can choose materials such as Acrylic, Polycarbonate, Fiberglass Reinforced Polyester, Polyethylene film or Polyvinyl cholride film.
  • Paranet / Screen
This material is usually used for covering all sides of the wall. Paranet is also useful as air circulation, as a filter of sunlight, and as a barrier to entry of insects from the outside.
  • Nail
  • Bolt
  • Rope
Basically the above mentioned materials commonly used as a binder and as a reinforcement of building construction.
Read also: How To Take Care Of Flowers In The Garden To Grow Well
Stages of Making Green House Simple
1. Determine the location and size of the green house
  In the site selection should consider several important factors such as land area, topography, climate, and availability of water resources. After that you can determine the size and direction of the building in accordance with the wishes and designs planned. When determining the size of the building you need to take into account the amount of material needed. The conclusion is, the larger the size then the greater the cost incurred.
2. Create a framework
  The shape of the skeleton can be tailored to your needs, either home-shaped or curved like a tunnel type. Make a frame from the wall, door to the roof. Each main skeleton structure you can give a kind of concrete holder to make it stronger. Use nails, bolts and straps as a binder between parts.
Sponsors Link

3. Closing the Framework
  Once the skeleton is completed, the next step is to cover the roof with UV plastic.After that you can close the wall with paranet. Use nails, bolts and straps to tie them. Put it properly and carefully so that the result is more neat and strong.
4. Finishing
  After the green house is completed, the next stage is to make arrangements in it.Settings can be adjusted with usability or function. You can also make barriers or make a kind of small shelves as a place to plant crops.
Tips on making green house:
  • Make sure the green house position extends from east to west, in order to get longer heat during the day to the plants.
  • If you are planning for artificial irradiation or lights inside the green house, make sure its position is close to the plant.
  • Make the position of the establishment of a green house far from the reach of children.
  • Preferably the green house has a working thermometer that can control the temperature setting, except when the green house has an automatic ventilation system. In the winter, indoor temperatures should be in the range of 45 degrees to 60 degrees so that plant growth is not disrupted quality.Although in a cold outside situation, but if the green house still get adequate lighting, the temperature inside the green house will still be warm.
  • Make sure the ventilation system works optimally, so that if the temperature inside the green house has started to rise too warm, outside cold air can enter and can neutralize the hot temperature back to the ideal temperature required by the plant.